The brake lines play an important role in ensuring your car slows down and comes to a stop when needed. The lines supply the brake system with the brake fluid it desperately needs and without it, your car might not come to a stop when you step on the brake.
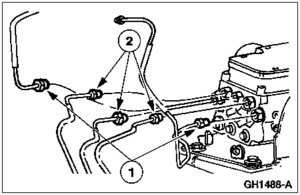
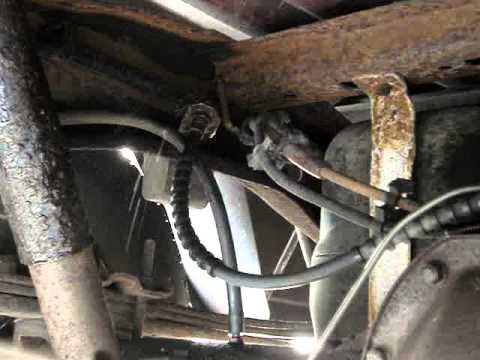
Right here, you will find a detailed Ford F150 brake lines diagram that should give you a clearer idea of how this component functions. In addition, we have included some tips on how to spot a faulty brake line system and make replacements by yourself.
Ford F150 brake lines Diagram


How the Ford F150 Brake Lines Work
The Ford F150’s brake system relies on hydraulic pressure to bring the vehicle to a quick stop when needed. When you step on the brake pedal, the piston in the master cylinder places brake fluid under pressure. The pressure is transmitted through the brake lines and the clipper’s piston is activated, pushing the brake pads towards the rotor which slows down the vehicle.
For this to be very effective, the brake lines need to be very solid and robust to handle the pressure. Unfortunately, the brake lines won’t always be efficient especially if you live in an area that gets a lot of snow as they would affect the brake lines, floor pans, rocker panels, and frame. This could cause the brake lines to deteriorate and you will have to replace them immediately.
Signs Your Brake Line is Faulty
You’re Leaking Brake Fluid
If you notice leaks under your car, you should immediately check the brake fluid. This doesn’t necessarily mean that you’re leaking brake fluid as it could be a coolant leak, transmission fluid leak, or even an oil leak.
The brake fluid is generally clear in color but will look brown if it is old and dirty. The fluid might also have a dry oil feel to it when touched. You should also smell the oil. If it smells like fish oil or castor oil, then you know for sure that you’re leaking brake fluid and you should get it checked.
Brake fluid light comes on
If your brake lines are deteriorating, the brake fluid light will come on. This shows that the brake fluid is leaking probably due to a crack in the brake line. The light comes on when you hit a low point in your brake fluid reserves. While this is very rare, you want to have your brakes and brake lines inspected by a professional immediately after the light comes on.
You can push the brake pedal completely
Normally, you shouldn’t be able to push the pedal all the way to the ground and not be able to stop. If this happens and it takes a long time to stop or you can’t stop at all, then you should get your car towed to a professional auto repair shop.
The brake lines Have deteriorated
If you’re one of those people that are handy with cars and you perform regular checks on your car, you should be able to notice that your brake lines are corroding or have visible moisture on them before they start failing. You might be able to notice that they are already leaking fluid and you can make the necessary repairs before it gets worse.
How to Replace Your Brake Lines
For most people, a visit to the auto repair shop is the best way to get your brake lines repaired but that might not be your case especially if you’re good with cars. Once you’ve got your replacement brakes, replacing the brake lines should be quite easy. You should get someone to assist you during the process or better still, let a professional handle it.
To get started,
- Support the vehicle securely at all four corners using jack stands.
- At the master cylinder, you can remove the old brake line but before that, hit it with a penetrant and let it sit for a few minutes, then carefully remove the nut with a flare wrench. The nut might not be that easy to remove so you will have to give the wrench a slight tap with a hammer to loosen the nut.
- Remove the old brake line at the hose fitting and at any junction, then pull them out completely. It is important to wear safety glasses while doing this as the old brake lines might be pretty crusty.
- Take measurements to determine the length of the new brake lines before cutting them to the proper length. The cutting tool is quite easy to use and looks like a pizza cutter. Clamp the tool onto the brake line at the desired length and spin the tool around gradually tightening it as you go. This should give you a clean cut in about a minute.
- Using a deburring tool, deburr the freshly cut ends of the brake line. It is important to do this as a rough end won’t create a smooth surface for a good seal. Also, spray clean the inside of the line right after deburring.
- Using the old brake line as a guide mark some light bends in the new line at the desired places. Go for more radical bends as you install the line. Pre-bend might not fit properly which will give problems during installation. For bigger bends, you will need the bending tool to gently form a line around a smooth surface.
- Put the fitting on the line before flaring. You should repeat this sequence 50 times. You might have to flare the end though some manufacturers sell pre-flared lines (which means you can skip this step). When you’ve flared the end, reattach the fitting at the junctions, brake hoses, and master cylinder. Refill the master cylinder. You will need an assistant to bleed the brakes to evacuate the air from the newly installed lines.
- Spray everything with brake cleaner, and then check the junctions for leaks as the system is bled. Check again after you start driving the vehicle and a few times next week.