Headphone pads, also known as ear cushions, are an essential part of any pair of headphones. They provide comfort and improve sound quality by providing a seal around the ear. Over time, headphone pads can become dirty and worn, which can affect their performance.
In this guide, we will show you how to clean headphone pads properly to keep them in top condition.
How to Clean Headphone Pads: The Steps Involved
To clean your headphone pads, follow the steps below
Step 1: Gather the necessary tools
Before you start cleaning your headphone pads, you will need to gather a few tools:
- A soft brush or toothbrush
- Mild soap or detergent
- Warm water
- A towel or microfiber cloth
- Rubbing alcohol or vinegar (optional)
Step 2: Remove the headphone pads from the headphones
The first step in cleaning your headphone pads is to remove them from the headphones. Depending on the type of headphones you have, the process of removing the pads can vary.
For over-ear headphones, gently lift the pad away from the headphones, taking care not to pull too hard or damage the pad.
For on-ear headphones, the pads are usually attached to the headphone cups with a screw or clip. Use a small screwdriver or a pair of pliers to carefully loosen the screw or clip and remove the pad from the headphones.
Step 3: Prepare the pads
Before you start cleaning, you need to remove the headphone pads from the headphones. Depending on the model of the headphones, this can be done by gently pulling on the pads or using a small tool to release the clips that hold them in place. Once you have removed the pads, place them on a flat surface where they can be easily accessed.
Step 4: Brush away any debris
Using the soft brush or toothbrush, gently brush away any debris or dirt that is visible on the headphone pads. Be careful not to scrub too hard, as this can damage the material. If you have a particularly dirty pair of pads, you may need to repeat this step a few times to remove all of the debris.
Step 5: Mix the cleaning solution
In a small bowl, mix a small amount of mild soap or detergent with warm water. The ratio of soap to water will depend on the type of detergent you are using and the level of cleaning that is needed. A general rule of thumb is to mix one part detergent with four parts water.
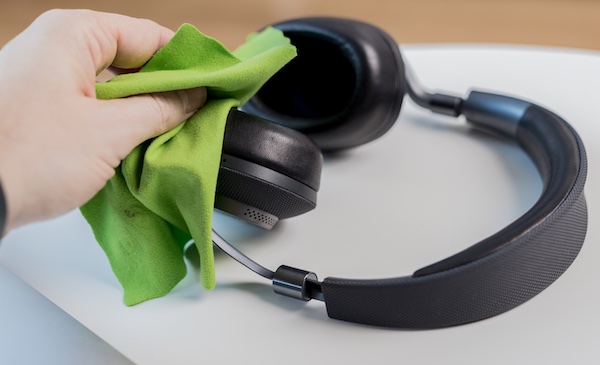
Step 6: Clean the pads
Using a towel or microfiber cloth, dip it into the cleaning solution and gently wipe the bluetooth headphone pads. Be sure to cover the entire surface of the pads, including the sides and any crevices. If you have a particularly dirty or smelly pair of pads, you may need to use a small amount of rubbing alcohol or vinegar to help remove the stains and odor.
Step 7: Rinse and dry
Once you have cleaned the headphone pads, rinse them thoroughly with warm water to remove any remaining soap or cleaning solution. Then, pat them dry. You can fix them back for use after they’ve been dried properly.
How to Maintain Your Headphones
Maintaining your headphones is essential to ensuring they last as long as possible. By following a few simple tips and taking good care of your headphones, you can extend their lifespan and keep them sounding and looking their best for longer. In this guide, we will discuss how to maintain your headphones and make them last longer, including cleaning them regularly, avoiding extreme environments, using them carefully, storing them properly, and replacing worn parts.
- Clean them regularly: Make sure to clean your headphones regularly to prevent the buildup of dirt and grime. This can be done by using a soft cloth and gentle cleaning solution, or by using a specialized cleaning kit specifically designed for headphones.
- Avoid using them in extreme environments: Avoid using your headphones in extreme environments such as extreme heat or cold, as this can cause damage to the internal components and reduce the lifespan of your headphones.
- Use them carefully: Handle your headphones with care, avoiding rough handling or excessive twisting or bending of the cables. This can cause damage to the internal wiring and reduce the lifespan of your headphones.
- Store them properly: Make sure to store your headphones properly when not in use. This can be done by using a protective case or pouch, or by hanging them up using a headphone hanger.
- Replace worn parts: If you notice any worn or damaged parts on your headphones, such as frayed cables or damaged earpads, make sure to replace them as soon as possible to prevent further damage and extend the lifespan of your headphones.
- Use them with care: Avoid exposing your headphones to liquids or other potential sources of damage, and be careful when using them around pets or small children. This will help to prevent accidental damage and extend the lifespan of your headphones.
- Avoid overusing them: Avoid overusing your headphones, as this can cause fatigue and damage to the internal components. Take regular breaks from listening to music and give your ears a rest to help prevent damage to your headphones and extend their lifespan.
- Use the correct charging method: Make sure to use the correct charging method for your headphones, as using the wrong type of charger can cause damage to the battery and internal components. Follow the manufacturer’s instructions carefully to ensure proper charging and extend the lifespan of your headphones.
- Use the correct volume level: Avoid using your headphones at high volumes for extended periods of time, as this can cause damage to your hearing and the internal components of your headphones. Use a moderate volume level and take regular breaks to avoid damaging your headphones and prolong their lifespan.
- Protect them from damage: Invest in a protective case or pouch for your headphones to prevent damage from drops or impacts. This will help to extend the lifespan of your headphones and keep them looking and sounding their best for longer.


