The Husqvarna drive belt is an important component of the riding mower that ensures it remains effective. If the belt breaks, the mower won’t be able to move. In addition, a worn belt will cause the mower to move sluggishly as the belt slips on the pulley.
If you’re noticing any problems with your mower drive belt, this Husqvarna Drive Belt Diagram should guide you in checking, removing, and installing a new belt.
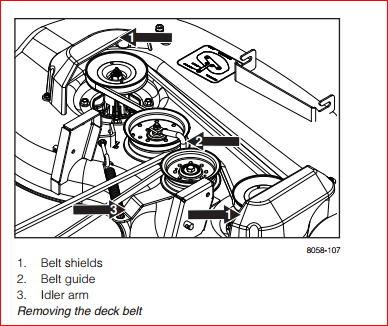
Husqvarna Drive Belt Diagram
How to Replace Husqvarna Mower
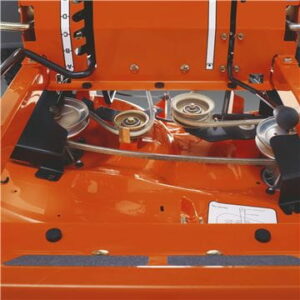
Mower Drive Belt Removal
- Make sure the engine is off and the tractor/mower is parked on a level surface. Engage the parking brake to ensure the mower doesn’t move.
- Lower the attachment lift to the lowest position
- Disengage the belt tension rod from the lock bracket. This should be done with caution as the belt rod is spring-loaded. Have a firm grip on the rod and release slowly.
- Remove screws from mandrel covers and remove the covers
- Check for any dirt or grass clippings that may have accumulated around mandrels and the entire upper deck surface. Remove any you find before proceeding to the next step.
- Remove the belt from the electric clutch pulley, both mandrel pulleys, and all idler pulleys
Mower Drive Belt Installation
- Install the belt around all mandrel pulleys and around the idler pulley
- Install the belt onto the electric clutch pulley
- Check belt for proper routing in the mower pulley grooves
- Reassemble the mandrel covers and securely tightly all screws
- Then engage belt tension rod on the locking bracket. Take the same precaution as you did when disengaging the rod.
- Raise attachment lift to the highest position and you can get back to mowing.
How To Replace Motion Drive Belt
For assistance, you can check the belt installation guide detailed on the bottom side of the left footrest in the mower.
Belt Removal
- Park the tractor on a level surface. Engage the parking brake to keep the mower in place.
- Before you start with the process, observe the entire motion drive belt and position of all belt guides and keepers
- Disconnect the clutch wire harness then remove the anti-rotation link on the right side of the tractor.
- Remove the belt from the stationary idler and clutching idler and then remove it from the centerspan idler.
- Pull the belt back towards the rear of the tractor then carefully remove it upwards from the transmission pulley and over the cooling fan blades.
- Then remove the belt downward from the engine pulley and round the electric clutch
- Slide the belt toward the rear of the tractor and off the steering and finally it is off the tractor.
Belt Installation
- Install the new belt from tractor rear to the front, then over the steering plate and above clutch brake pedal shaft
- Pull the belt towards the front of the tractor and roll it around the electric clutch and then onto the engine pulley
- Next, pull the belt towards the rear of the tractor. Carefully, work the belt down around the transmission cooling fan and onto the input pulley. Make sure that the belt is inside the belt keeper.
- Install the belt on the centerspan idler and through the stationary idler and the clutch idler.
- Reinstall the anti-rotation link on the right side of the tractor and tighten securely.
- Reconnect the clutch harness and make sure the belt is in all pulley grooves and inside all the belt guides and keepers.
Why Your Mower Belt Keeps Breaking
If you find yourself replacing your mower belts every year or more often than not, there is likely to be something wrong with the mower other than a worn-out or damaged mower belt. Belt breakage can be due to various reasons including the ones listed below.
Excessive Grass Clippings
One of the most common causes of belt breakage is excessive grass clipping on the deck. Grass clippings shouldn’t cause any problems normally but when they become excess, they can work their way under the pulleys and deck covers and cause several problems. To prevent this from happening, you should clean off your deck every time you use the mower.
Missing Belt Guards
Belt guards are important for the proper functioning of the mower. The guard is well secured around the pulley and is essential for keeping the belt in place. However, the guard could come loose which will cause the belt to fly off. This is not common but could be the reason for your belt breakage problem.
Pulley Wear and Tear
If you start noticing belt breakage after several years of use, then it could be due to pulley wear and tear. Check the pulleys for wear and worn out bearings. A pulley rides on bearings which allow it to spin freely.
When the bearings wear out, the pulley won’t be able to spin freely which creates friction between the pulley and the belt. In some cases, this can cause the belt to break. If you notice any signs of wear on the pulley and the bearings, replacing the components will help stop belt breakage.