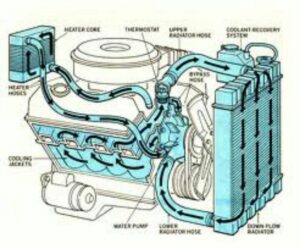
This Northstar Engine Coolant Flow Diagram shows the inner working system of the coolant needed to keep the engine cool while providing optimal performance. The diagram will also help you to take note of delicate parts of the cooling system and assist you with an easy diagnosis of cooling problems.
We have included guides on how to flush your cooling system to ensure that it maintains optimal performance and the right steps to take in the case of an overheating engine.
Northstar Engine Coolant Flow Diagram
How to Flush the Cooling System on a Northstar Engine
Whether your vehicle’s cooling system is having problems or not, annual flushing is very important to prevent future problems like corrosion of the internal parts which can cause head gasket failure as early as 60,000 miles. Northstar engines are not safe from such issues and as usual, prevention is the best measure to take. The steps below will help you handing flushing the cooling system of your Northstar engine on your own.
- Wait for the vehicle to cool down completely before you start the flush. To know if the vehicle is cool, you should be able to place your palm on the radiator cap without getting burned.
- Place a bucket underneath the radiator and open the draincock. This is a small, white knob on the bottom of the radiator. When opened, it will completely drain all coolant in the radiator. Close the draincock once it is completely drained.
- Open the radiator cap and fill it with the radiator flush, then pour water from a hose into the radiator and replace the radiator cap.
- Run the engine for up to 20 minutes with the heater set to the hottest setting. It will take up to 10 minutes for the car to reach operating temperature and another 10 minutes to circulate the flush.
- Allow the engine to cool again, then drain the radiator with a bucket as you did before
- Now, you have to fill the radiator with water, close the radiator cap and allow it to turn for 20 minutes with the heater on the hottest setting.
- Let the engine cool then drain the radiator and fill it up with half a mixture of coolant and half a mixture of distilled water. When done, close the radiator cap all the way.
- Finally, you should run the engine for 20 minutes to allow the coolant to mix with water.
How to Fix Overheating on a Northstar
Overheating is a big problem in Northstar engines that indicate a problem with the coolant system. It could also be due to other issues. This guide should help you fix the problem with your engine without the assistance of a professional.
Check the Coolant Level
One of the most common causes of an overheating Northstar engine is a coolant leak. Before you start touching or fixing anything, you should check how much coolant is in the system. To get started, ignite the engine and let it idle for at least 10 minutes. Look to the underneath your engine and check if you will notice a yellow, blue, or green liquid. If you do then you are dealing with a coolant leak and should take the care to the auto repair shop for further inspection.
Check the water pump system
The water pump is needed to circulate coolant from the radiator to the engine. If it fails, the engine will not get the cooling it needs which will cause it to overheat. Inspect the water pump and check if the impeller spins. You can tell if there is little or no coolant circulation.
Inspect the fan blade and radiator fins
Faulty fan blades and radiator fins could also cause the engine to overheat. You should check that the fan blade spins when you ignite the engine. If it doesn’t then you could be dealing with a host of problems. Get your car to a mechanic to help you diagnose the actual problem.
Check the thermostat
The thermostat is an important component that helps to control the flow of coolant into the cylinder block and radiator depending on the temperature of the engine. A faulty thermostat won’t allow coolant to flow which will cause the engine to overheat. To check the thermostat, let the engine idle for about 10 minutes. After that, touch the upper radiator hose. This should be hot if the thermostat is working fine. If it is not, then the thermostat might have to be replaced.
Check for a leaky head gasket in your engine
If you’re not dealing with a coolant leak or a faulty thermostat, you should check for a leaky head gasket next. This might be quite difficult because you won’t find an external leak if this happens. Instead, the head gasket will leak coolant directly into the engine’s cylinders.
You will notice a rapid loss of coolant with no visible coolant leak on the ground underneath the vehicle if this is the problem. Another indication of a leaky head gasket is white steam coming out of the exhaust. If you notice this, then you should take your vehicle to the mechanic for repairs.