With the Ford F-150 Stereo Wiring schematic, you should be able to install an aftermarket stereo with complete ease. The wiring diagram is important to guide you in setting up the radio system correctly as mistakes could lead to problems with the radio or speakers. The wiring diagram will also help you with correcting any errors with the system as well as making repairs.
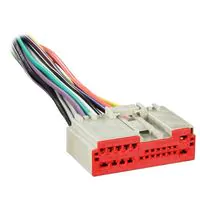
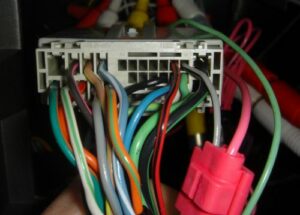
Ford F150 Radio Wiring Harness Diagram
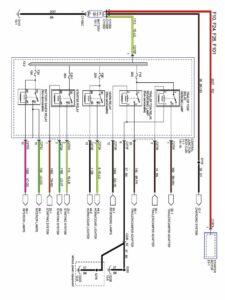
How To Perform Ford F150 Stereo Wiring
The Ford F150 stereo wiring is different for each generation of the truck. The DIN setup features different codes and colors that have to be followed to the letter.
Seventh generation F150 stereo wiring (1980–86)
The installation process should be very easy though the age of the truck could cause problems like damaged speaker wires. This generation doesn’t come with any amplifier or subwoofer installed.
- Car Radio Battery Constant 12v+ Wire: Light Green
- Car Radio Accessory Switched 12v+ Wire: Yellow/Green
- Car Radio Ground Wire: Chassis
- Car Radio Illumination Wire: Blue/Brown
- Car Audio Front Speakers Location: Doors
- Left Front Speaker Positive Wire (+): Green
- Left Front Speaker Negative Wire (-): Black/White
- Right Front Speaker Positive Wire (+): White/Red
- Right Front Speaker Negative Wire (-): Black/White
Eighth generation F150 stereo wiring (1987–91)
This generation features a single DIN configuration. The wiring might also pose a problem due to the age of the truck, however, this makes it easier to install the speaker or amplifier.
- Car Radio Battery Constant 12v+ Wire: Green/Yellow
- Car Radio Accessory Switched 12v+ Wire: Yellow/Black
- Car Radio Ground Wire: Red or Black
- Car Radio Illumination Wire: Blue/Red
- Left Front Speaker Positive Wire (+): Orange/Green
- Left Front Speaker Negative Wire (-): Black/White
- Right Front Speaker Positive Wire (+): White/Green
- Right Front Speaker Negative Wire (-): Black/White
- Right Rear Speaker Negative Wire (-): Green/Orange
- Left Rear Speaker Positive Wire (+): Pink/Green
- Left Rear Speaker Negative Wire (-): Pink/Blue
- Right Rear Speaker Positive Wire (+): Pink/Blue
Ninth generation F150 stereo wiring (1992–96)
This generation is the last to use the bench-style dashboard but it still follows the single DIN style stereo.
- Car Radio Battery Constant 12v+ Wire: Green/Violet
- Car Radio Accessory Switched 12v+ Wire: Black/Pink
- Car Radio Ground Wire: Black/Green
- Car Radio Illumination Wire: Light Blue/Red
- Car Stereo Antenna Trigger Wire: Blue
- Left Front Speaker Positive Wire (+): Gray/Light Blue
- Left Front Speaker Negative Wire (-): Tan/Yellow
- Right Front Speaker Positive Wire (+): White/Light Green
- Right Front Speaker Negative Wire (-): Dark Green/Orange
- Left Rear Speaker Positive Wire (+): Orange/Light Green
- Left Rear Speaker Negative Wire (-): Light Blue/White
- Right Rear Speaker Positive Wire (+): Orange/Red
- Right Rear Speaker Negative Wire (-): Brown/Pink
Tenth generation F150 stereo wiring (1997–2003)
The tenth generation features a stock stereo using a double DIN setup that might require more work to install properly.
- Car Radio Battery Constant 12v+ Wire: Light Green/Pink
- Car Radio Accessory Switched 12v+ Wire: Black/Violet
- Car Radio Ground Wire: Black/Green
- Car Radio Illumination Wire: Light Blue/Red
- Car Stereo Antenna Trigger Wire: Blue
- Left Front Speaker Positive Wire (+): Gray/Light Blue
- Left Front Speaker Negative Wire (-): Tan/Yellow
- Right Front Speaker Positive Wire (+): White/Light Green
- Right Front Speaker Negative Wire (-): Dark Green/Orange
- Left Rear Speaker Positive Wire (+): Orange/Light Green
- Left Rear Speaker Negative Wire (-): Light Blue/White
- Right Rear Speaker Positive Wire (+): Orange/Red
- Right Rear Speaker Negative Wire (-): Brown/Pink
Eleventh generation F150 stereo wiring (2004–08)
The eleventh generation features a front paneling on the dashboard which can be removed as a single part to give you access to the factory stereo.
- Car Radio Battery Constant 12v+ Wire: Light Green/Violet
- Car Radio Accessory Switched 12v+ Wire: Light Green/Yellow
- Car Radio Ground Wire: Black
- Car Radio Illumination Wire: Light Blue/Red
- Left Front Speaker Positive Wire (+): Orange/Light Green
- Left Front Speaker Negative Wire (-): Light Blue/White
- Right Front Speaker Positive Wire (+): White/Light Green
- Right Front Speaker Negative Wire (-): Dark Green/Orange
- Left Rear Speaker Positive Wire (+): Gray/Light Blue
- Left Rear Speaker Negative Wire (-): Tan/Yellow
- Right Rear Speaker Positive Wire (+): Orange/Red
- Right Rear Speaker Negative Wire (-): Brown/Pink
Twelfth generation (2009–14)
Most aftermarket radio kits allow for easy installation with a completely new front fascia and wiring adaptors. This wiring guide should help you get things in order.
- Car Radio Battery Constant 12V+ Wire: White/Red
- Car Radio Accessory Switched 12V+ Wire: Blue
- Car Radio Ground Wire: BLack/Blue
- Car Radio Dimmer Wire: Violet/Gray
- Left Front Speaker Positive Wire (+): White
- Left Front Speaker Negative Wire (-): White/Brown
- Right Front Speaker Positive Wire (+): White/Violet
- Right Front Speaker Negative Wire (-): White/Orange
- Left Rear Speaker Positive Wire (+): White/Green
- Left Rear Speaker Negative Wire (-): Brown/Yellow
- Right Rear Speaker Positive Wire (+): Brown/White
- Right Rear Speaker Negative Wire (-): Brown/Blue