The Chevrolet 305 distributor is the center of the ignition system. The distributor cap and rotor are vital in getting the vehicle started and if they fail, you will have to deal with several engine and vehicle problems.
In this post, we will reveal the chevy 305 distributor diagram. This will give you an insight into the details of the distributor’s components so that you can learn more about how it works. We also included information on how to detect a faulty distributor and make the necessary fixtures.
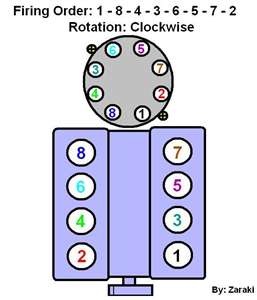
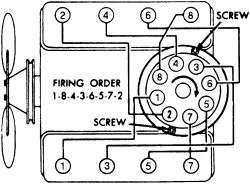
Chevy 305 Distributor Diagram
How the Chevy 305 Distributor Works
The distributor rotor and the cap work together to trigger the firing of the ignition coil while also helping to control ignition timing and routing high voltage to the spark plugs.
The distributor rotor receives high voltage electricity from the ignition coil which is then sent through the distributor through an electrode on the tip of the rotor. While the rotor spins, electrical power is transferred from the rotor to electrodes (plug wires) in the distributor cap. The entire sequence creates a combustion process in the engine that starts the vehicle.
Signs of a Bad Ignition Cap and Rotor
Your check engine light is on
In older vehicles like those making use of the Chevy 305 engine, the distributor cap and rotor are important parts of the ignition system. A Check Engine Light is connected to these components and will light up when there is a problem such a cracked distributor cap with condensation inside. The Check Engine light could also signify that the electrical signal coming from the distributor is inconsistent.
The vehicle won’t start
The engine needs a spark, fuel, and mechanical compression to start. If the distributor rotor or cap is broken, voltage will not flow to the sparks resulting in an engine that cranks but won’t fire.
The engine stalls when idling
At the base of the distributor cap are small electrodes called terminals. If these terminals become burnt or covered in carbon buildup, it can because the engine to stall when idling. What’s happening here is that the engine is skipping a cylinder from the firing order.
Determining Whether to Replace the Distributor Cap and Rotor
If you notice any of these signs on your vehicle’s engine, then the distributor cap and rotor will have to be checked. If you notice any signs of damage on either of them, then both will have to be replaced.
However, you won’t always have to wait for the engine to give the signs above to check on the rotor and distributor cap. It is recommended that you perform routine tune-ups every 25,000 miles and replace both of them if you notice any premature signs of wear and tear.
Regardless of whether both the distributor cap and rotor show signs of damage, they should be replaced every 50,000 miles to ensure proper working of the engine. Changing both components is quite easy to perform and won’t require the input of a professional.
How to Replace the Distributor Cap and Rotor on Chevy 305
To replace these components, you will have to purchase a replacement distributor cap and rotor kit. You could be lucky enough to get both items as a kit. Ensure that you replace both components at the same time. In some cases, the kits will include the gaskets, new spark plug wires, and other replacement items.
If you find all these in your kit, you should use them all. The most work when it comes to replacing the distributor rotor and cap is removing the ancillary components that restrict access to the distributor.
Also while taking everything apart, mark the spark plug wires, location of the distributor, the distributor cap, and the rotor so that you can easily reinstall the new components. If you make mistakes here you will still have to deal with the same ignition problems you’re trying to fix.
- Remove the positive and negative cables of the battery and place them away from the battery terminals. Remove the engine cover and air filter housing to give you free access to remove the distributor cap and rotor
- Before taking out the distributor cap, you should mark the distributor components. You can go ahead to take a photo of the setup so that you have an idea of how it actually looks like. Take note of the marked areas as you would need to reinstall the new components in these areas to reduce the chances of misfire after installation. Using a marker or tape, mark the location of the spark plug wires as you remove them as well as other components.
- Once marked, you can go ahead and remove the spark plug wires from the distributor cap. Next, take off the bolts or clips holding the distributor. This should be on the side of the cap. You will need to use a socket, extension, and ratchet and remove them one at a time. After that, take the old distributor cap off the distributor.
- You will find the rotor in the center of the distributor housing. You will notice a pointed end and a blunt end in the rotor. You will have to place a screwdriver along the edge of your rotor to help you mark the pointed end where you will place the new rotor.
- If the rotor is secured to a screw, carefully remove it with a magnetized screwdriver to avoid losing the screw inside the distributor shaft as it could find its way into the engine and cause problems. With that done, take the old rotor out of the distributor and match it with the replacement rotor before disposing of it.
- You can go ahead to use a can of compressed air to spray the distributor to remove any debris (this can be skipped). When installing the new rotor, reset it to the precise location as the old rotor. Use the marks to confirm that the pointed end is facing the right direction. Replace the old screw in the rotor with a new one.
- Place the new distributor cap on the distributor and secure it with the screws or clips you removed. Reinstall the spark plug wires using the marks you made in the previous steps. Replace the engine cover and air filter housing and reconnect the battery cables.