Knowing the parts of the Holley Carburetor will help in making the right adjustment and getting the right setting when adjusting the air-fuel mixture or idle mixture. These settings help with fuel economy and boost the horsepower of the engine.
This Holley Carburetor Parts Diagram should guide you in making any adjustments or tuning the carburetor to the right setting.
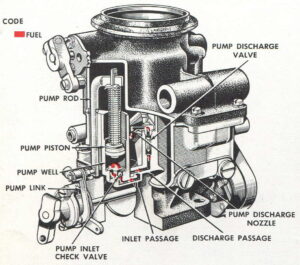
Holley Carburetor Parts Diagram
How to Adjust the Air Mixture for a Holley Carburetor
Properly adjusting a Holley carburetor’s air/fuel mixture will determine the fuel economy as well as the performance of the engine. If the mixture is too rich, it won’t have a proper quantity of air which can lead to foul spark plugs and poor gas mileage. If the mixture is too lean, it will be getting too much air which can destroy the engine if not corrected. By following these steps, you will be able to adjust the air mixture for a Holley Carburetor.
Locating the air/fuel mixture screws
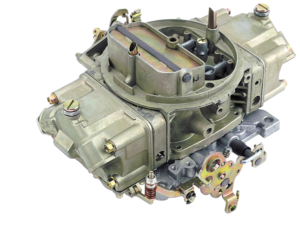
The Holley carburetor consists of a body and several components attached to the body. The body of the carburetor is the larger, square-shaped center section. At both, the front and back of the body is a single float with a rectangular block in between. The rectangular block is called a metering block and has a screw on each side. These two screws control the air/fuel mixture of the carburetor.
Setting the air/fuel mixture screws
Set both air/fuel mixture screws to a baseline point so that the mixture can be adjusted while the engine is idling. To do this, turn each screw in a clockwise direction using a flathead screwdriver until both screws seat, then back both screws out by 1-1/2 turns.
Turn the engine on and allow it to idle, then turn each idle mixture screw, one at a time in a clockwise direction. Turn each screw in 90-degree increments while listening to the engine’s idle speed. Once the engine’s idle speed begins to slow, back each idle mixture screw out 90 degrees to complete the steps
How to Set An Optimized Idle Mixture and Speed
Before you start the engine, use a small screwdriver to check the position of each idle mixture screw. Turn each idle mixture screw clockwise and count the number of turns until the screw lightly seats. Make the turns gently to prevent damage to the seats in the metering block. Do this for all four idle mixture screws and set them to the same position.
- With the engine idling in park and with the emergency brake engaged, set the idle speed at the desired rpm. You can choose 850 rpm for this application. The curb idle should be set with the idle speed adjustment screw on the primary linkage on the driver side of the carburetor.
- Start by adjusting the driver side idle mixture (clockwise) by 1/8th of a turn while monitoring the vacuum gauge. If the engine speed increases, adjust the passenger side idle mixture screw to the same amount and monitor the engine speed or vacuum reading. Repeat this process and evaluate the result. If the vacuum drops after adjusting the first idle screw, return to the base setting and turn the mixture screw outward roughly 1/8th turn.
- If after an initial adjustment, the idle speed goes beyond the desired rpm, turn the idle speed screw counterclockwise to return to the original engine speed. If the initial adjustment on the idle mixture screw results in a vacuum reading higher than before, move the idle mixture screw no more than 1/8th of a turn. Do this on both sides of the carburetor and compare the results. If the vacuum drops, return to the higher setting and watch if the vacuum increases.
- If turning the idle mixture screws out does not improve the engine speed or idle vacuum, then a leaner setting could be the best choice.
- Get a friend to sit behind the wheel and place the transmission in Drive with his foot firmly on the brakes. Monitor the vacuum gauge and ensure that the idle is stable. When the engine is placed in gear, it will produce a slightly lower vacuum gauge reading. This is normal due to the load applied to the engine.
- Place the transmission back into Park and wait till the idle rpm stabilizes. After this, the engine should now idle at the desired idle speed. You might want to consider making the idle mixture slightly leaner as this helps to reduce excess hydrocarbons in the exhaust.
- When trying to achieve an ideal idle mixture setting, this should be done by working slowly and deliberately in search of the highest manifold vacuum setting with only small changes to the idle mixture screws. Evaluate the changes to see if matches the desired results.