In a Briggs and Stratton machine, the carburetor is typically found to the side or top of the engine depending on the machine you have.
In this article, we have provided a Briggs and Stratton carb adjustment diagram to give you an insight into the components of the carburetor and how you can make the right adjustments to boost the efficiency of the carburetor.
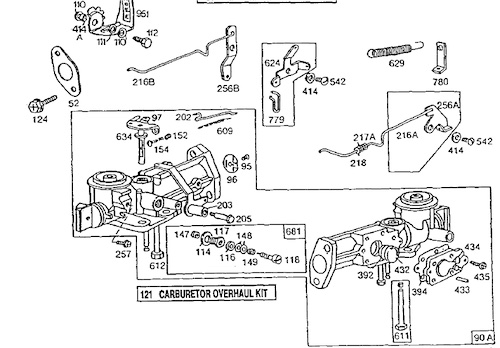
Briggs And Stratton Carb Adjustment Diagram
How to adjust the carburetor on a Briggs and Stratton engine
Carburetor adjustments become more necessary as the machine is continuously operated, however, you might want to make such adjustments right after you purchase the machine to save fuel or meet up with the amount of load you want to put the machine through. The carburetor ensures a proper mixture of fuel and air in the engine cylinder which is the site of combustion.
With continuous use, the carburetor will lose its efficiency, delivering too lean or too rich air-fuel ratio. The time of the mixture could also become less reliable which makes carb adjustments a must.
Adjusting the carburetor will require tightening or loosening several screws. Normally, the factory adjustment of the carburetor ensures optimal performance, with time, however, engine RPMs, speeds, and mixture settings could be disturbed. This makes it important to make adjustments. Follow the steps below to adjust your carburetor on a Briggs and Stratton engine
You will need your tools to adjust the Briggs and Stratton carb. Gather the following
- A pair of safety gloves
- Screwdrivers
- Set of pliers
- Wrench
- Carburetor cleaner
- RPM gauge or tachometer
Step 1
Prep the lawnmower by running the mower engine and letting it warm up for up to five minutes. Turn the mower in a turtle shape bent form by pulling the choke lever to the slow position. Take note of the engine sound and noise level at this idle position. Turn off the ignition and let it cool down. Set the parking brakes in position. To stop the mower from rolling, set the drive gear to a neutral position.
Step 2
Locate the carburetor adjusting screws. There should be two idle adjustment screws at the top of the carburetor. Unblock the nut on the air filter cover to get to the filter. Remove the air filter casing. Keep all the nuts and screws in a safe place for re-installation later on. Spray the carburetor clean on the carburetor to clear out any debris or dirt.
Step 3
Find and rotate the idle screw in a clockwise direction using a screwdriver. Keep doing so until the needle on the end almost touches the casing of the carburetor. Turn the screw 15 turns counterclockwise. This is the ideal tightening but you might want to make your own adjustments.
Step 4
Depending on your carburetor type, you might find the main jet adjustment screw at the bottom of the float bowl. You will have to adjust the main jet screw by turning it clockwise until the needle on the end of the screw touches the base. You will also have to turn the screw counterclockwise 1.5 turns to a max of 2 turns to give the lean mixture.
Step 5
Start your engine and let it run for about 7 minutes. Check the engine sound and adjust the idle screw a bit clockwise and a bit counterclockwise till you get the right tuning. When the engine sound is just right, place the air filter casing and tighten the connections.
Adjusting the High-Speed Mixture
The high-speed mixture is the air-fuel mixture delivered by the carburetor when the engine is under load. This will increase the engine’s RPMs.
- To adjust the high-speed mixture, locate the high-speed adjustment screw on the opposite side of the idle adjustment screw (it is possible that you won’t find this screw on your carburetor).
- Once you’ve located the high-speed adjustment screw, remove the air filter casing and the filter to give you access to the carburetor’s main body.
- Using a screwdriver, turn the high-speed screw clockwise until the needle on the end of the screw touches the seat. Then, turn the screw counterclockwise 1.25 turns.
- Set the throttle speed to a fast position, then start the engine. Turn the high-speed screw clockwise until the engine slows down and then in a counterclockwise direction as it slows. Stop at the center point where the engine has the best sound (You can also use an RPM gauge to determine this).
- To test your adjustment, move the throttle from slow to fast position, and then back to slow.
- Finally, attached the filter casing and filter, then tighten with the nut.
Adjusting Carburetor Choke Linkages
- Remove the air filter cover (outer casing of air filters) and locate the carburetor’s choke linkage. Before you make any adjustments, move the throttle lever to the fast position.
- Loosen the bracket holding casing. Using a flathead screwdriver, loosen the screw on the bracket and release the cable. Do not take the screw completely out.
- Adjust the choke linkage to boost how rich the mixture of air and fuel will be in cold weather. To do this, move the choke cables with your fingers to close the choke plate on the carburetor. Hold the cables in this position and tighten up the bracket down with the cable casing to keep it in place. Switch the throttle from fast to slow and then fast again and watch as the choke plate opens and closes. Adjust it in a medium position.
Checking the Spring Connector
- You might also want to check the spring connector as it could be loose due to overuse and impede the engine’s ability to give higher RPMs. Tighten it to see if there is any improvement.
- You should also check the fuel line, air intake, and ensure they are free of dirt, debris, and any clogs. Wipe the flow lines clean by giving them a petro wash and drying in the sun. Avoid using water in any of the cleaning processes. When done, couple the components the same way you opened them.
- When you’re with all the adjustments, check the engine RPM with a tachometer and make any other adjustments you consider necessary.