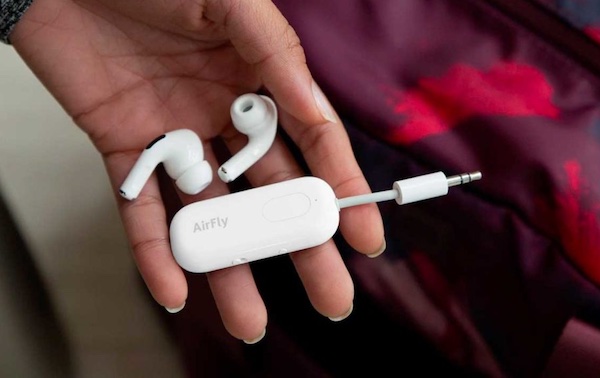
To connect your AirPods to a PC, you will need to have a Bluetooth adapter installed on your computer. This is because AirPods, like many other wireless headphones, use Bluetooth technology to connect to devices.
However, this doesn’t mean all is lost for your old PC that doesn’t allow for Bluetooth connections. You can connect your Airpods to your PC using a Bluetooth adapter. This will give your PC Bluetooth functionality, allowing your PC to detect and connect to your AirPods.
How to Connect AirPods to PC without Bluetooth: Step by Step
In this piece, we will show you how to connect your Airpods to your PC without Bluetooth through the use of the Bluetooth Adapter.

Step 1: Get Your Bluetooth Adapter
A Bluetooth adapter is a device that connects to a computer or other device and allows it to communicate wirelessly with other Bluetooth-enabled devices.
The main function of a Bluetooth adapter is to enable wireless communication between devices, allowing users to connect and transfer data without the need for physical cables. If you have a PC that does not allow for Bluetooth connections, this device would help you work around that.
To use a Bluetooth adapter on a PC, users first need to install the adapter and any necessary drivers. Once installed, the adapter can be used to connect to other Bluetooth-enabled devices, such as your AirPods as well as your headsets, speakers, and keyboards.
The adapter uses radio waves to transmit data between devices, allowing users to communicate wirelessly over short distances, so you will need to stay pretty close.
Step 2: Install the Bluetooth Adapter on your PC
Installing a Bluetooth adapter on your PC is a simple and straightforward process that can provide you with a convenient way to connect and use wireless devices with your computer. By following these steps, you can easily set up a Bluetooth adapter and start using it with your PC.
- Determine the type of Bluetooth adapter that is compatible with your PC. In order to properly install a Bluetooth adapter on your PC, you need to make sure that you are using the correct type of adapter for your specific system. This can typically be found by checking the specifications for your PC or by consulting with the manufacturer.
- Locate an available USB port on your PC and plug in the Bluetooth adapter. Once you have determined the correct type of adapter for your system, the next step is to plug it into an available USB port on your PC. Make sure to securely insert the adapter into the port, as a loose connection can cause issues with the installation process.
- Install the drivers and software that come with the Bluetooth adapter. Once the adapter is plugged in, you will need to install the drivers and software that come with it. This can typically be done by inserting the installation disc that came with the adapter and following the on-screen instructions. If you do not have an installation disc, you may be able to download the necessary drivers and software from the manufacturer’s website.
- Once the drivers are installed, restart your PC. After the drivers and software have been installed, it is important to restart your PC to ensure that the changes take effect. This will allow the system to properly recognize and utilize the Bluetooth adapter.
- Go to the Control Panel and click on “Hardware and Sound” and then “Bluetooth Devices.” Once your PC has restarted, you will need to access the Bluetooth settings in order to pair your devices. To do this, go to the Control Panel and click on “Hardware and Sound,” then select “Bluetooth Devices.”
- Select the “Add a Bluetooth device” option and follow the on-screen instructions to pair your Bluetooth device with your PC. Once you are in the Bluetooth settings, you will need to select the “Add a Bluetooth device” option. This will initiate the pairing process, and you will need to follow the on-screen instructions to complete it.
- Once the device is paired, you can use it with your PC. Once the pairing process is complete, your Bluetooth device should be ready to use with your PC. You may need to configure any additional settings or preferences in order to use the device to its full potential.
Step 3: Connect Your Airpods to Your PC
To connect AirPods to a PC, you will need to make sure that your PC is Bluetooth-enabled using the Bluetooth Adapter. Then, you can follow these steps:
- On your PC, go to the Start menu and open the “Settings” app.
- In the Settings app, go to the “Devices” section and click on the “Bluetooth & other devices” tab.
- Make sure that Bluetooth is turned on by sliding the toggle switch to the “On” position.
- On your AirPods, press and hold the setup button on the back of the charging case for a few seconds. The setup button is located next to the charging port on the bottom of the case.
- When the AirPods are in pairing mode, they will appear in the list of available Bluetooth devices on your PC. Click on the AirPods in the list to connect them to your PC.
- Once the AirPods are connected to your PC, you should be able to use them to listen to audio from your PC. You may need to adjust your audio settings on your PC to use the AirPods as your default audio output device.
Wrapping Up
In conclusion, connecting AirPods to a PC is a simple process that can be accomplished by following a few steps. First, make sure that your PC has Bluetooth capabilities, which can be done using the Bluetooth adapter.
You should then ensure that the Bluetooth is turned on. Then, put your AirPods into pairing mode and select them from the list of available Bluetooth devices on your PC. Once connected, you can use your AirPods to listen to audio from your PC.
It may be necessary to adjust your audio settings to use the AirPods as your default audio output device. Overall, connecting AirPods to a PC is a quick and easy process that can enhance your audio experience.


